Troubleshooting QuickBooks Sync Errors in Loadlink Dispatch
Overview
The QuickBooks Integration for Dispatch is designed to simplify your invoicing workflow, but sometimes errors can occur during the invoice syncing process, particularly if setup was not completed in particular categories. The good news? Most issues can be fixed quickly and easily to get you back on track.
This guide outlines five common QuickBooks sync errors and how to resolve them so you can get back to business quickly.
Click on the error box to navigate between them
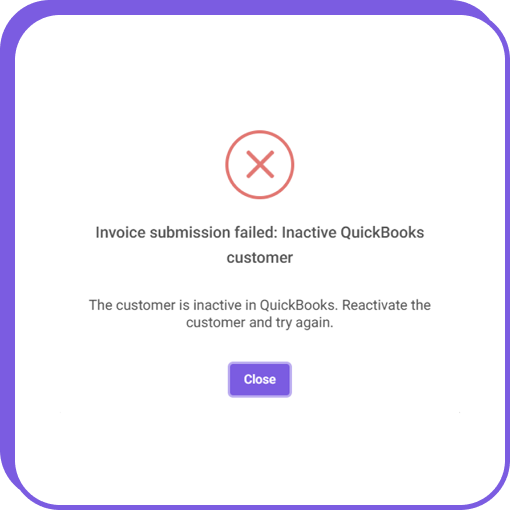
🚨 Error Message:
“Invoice submission failed: Inactive QuickBooks customer.”
Why This Happens
The customer you have assigned the invoice to in Dispatch is marked as inactive or deleted in QuickBooks.
How to Fix It:
- Log in to QuickBooks Online.
- Navigate to Sales, then click on Customers.
- Click on the gear icon ⚙️ and select “Include Inactive”.
- Find the inactive customer and click on the record.
- Click on the “Make Active” button from that record.
- Return to Dispatch and resubmit the invoice.
- If the customer was not set up, you will have to set them up in order to sync them with Dispatch.
- See the Setting up customers module for more information.
✅ Best Practice: Regularly review customer records in QuickBooks to ensure they remain active before sending invoices.
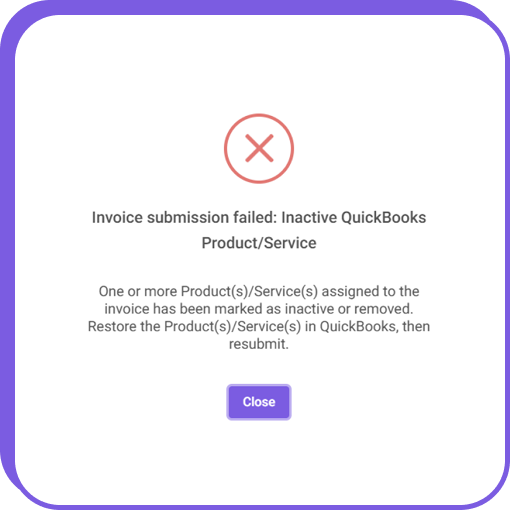
🚨Error Message:
“Invoice submission failed: Inactive QuickBooks Product/Service”
Why This Happens
Each invoice line item on your Dispatch invoice must have a corresponding product/service code in QuickBooks. If the item doesn’t exist in QuickBooks, the invoice won’t sync with Dispatch.
How to Fix It:
- Log in to QuickBooks Online.
- Go to “Sales”, then click on the Products and Services tab.
- Click on the Funnel icon and select ‘Inactive’ under the ‘Status’ selection.
- Find any Products and Service records that are synced with Dispatch and select “Make Active” from the Action column.
- Return to Dispatch, hit the Refresh button, and resubmit the invoice.
✅ Best Practice: Before syncing, ensure that all chargeable services or products in Dispatch have a corresponding product/service code in QuickBooks.
ℹ️ Alternative Fix:
If you prefer, you can create new Product/Service items in QuickBooks for integration.
Once added, make sure to resync Dispatch with QuickBooks so that Dispatch will recognize the new item.
Follow next steps:
- Log into Dispatch
- Navigate to the Accounting tab and then click on QuickBooks Setup from the sidebar.
- Click the “Settings” button to update Dispatch with the latest QuickBooks data.
- Remap any newly created Product/Service items to the corresponding Dispatch invoice line items.
- Retry submitting the invoice in Dispatch as usual.
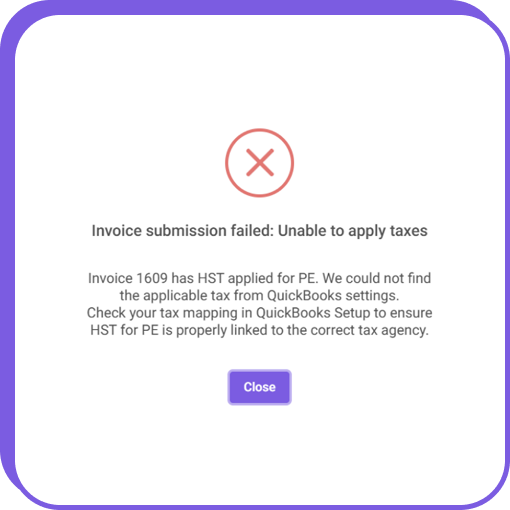
🚨 Error Message:
“Invoice submission failed: Unable to apply taxes”
Why This Happens
If an invoice in Dispatch includes taxes, but the integration hasn’t been set up with the correct QuickBooks Tax Agencies, the sync will fail.
How to Fix It:
- Log in to QuickBooks Online.
- Navigate to Taxes → Sales Tax Settings.
- Verify that the correct tax agency exists and is enabled.
- If needed, create a new tax agency to match the Dispatch tax settings.
- Return to Dispatch and ensure all Tax Agency mapping was implemented correctly. To do this, simply navigate to the Accounting module, then click on QuickBooks Setup, then click the “Settings” button.
- Make sure you add any additional Tax Agency mapping during the Resync process.
- Retry submitting the invoice again and check QuickBooks again to ensure that the totals and invoice numbers match between Dispatch and QuickBooks.
✅ Best Practice: Ensure all tax settings in Dispatch align with those in QuickBooks before sending invoices.
🚨 Error Message:
“Invoice submission failed: Mismatching currency.”
Why This Happens
QuickBooks does not allow invoices to be submitted if the customer’s currency in QuickBooks does not match the invoice currency in Dispatch. Since a QuickBooks customer’s default currency cannot be changed once set, the invoice must be adjusted to match.
How to Fix It:
- Log in to QuickBooks Online.
- Navigate to Customers and find the one linked to the invoice.
- Check the customer’s default currency (this setting cannot be modified in QuickBooks). If the currency does not match, update the invoice currency in Dispatch:
- Go to the Load Module and then click on the General tab in Dispatch.
- Change the Load Status back to “Delivered”.
- Go to the Order module and click on the Rate tab in Dispatch.
- Use the currency toggle to select the correct currency.
- Regenerate the invoice in Dispatch. This will automatically update the Load Status back to “Invoiced”.
- Retry sending the invoice with QuickBooks.
✅ Best Practice: Before syncing invoices, confirm that the customer’s currency in QuickBooks matches the invoice currency in Dispatch.

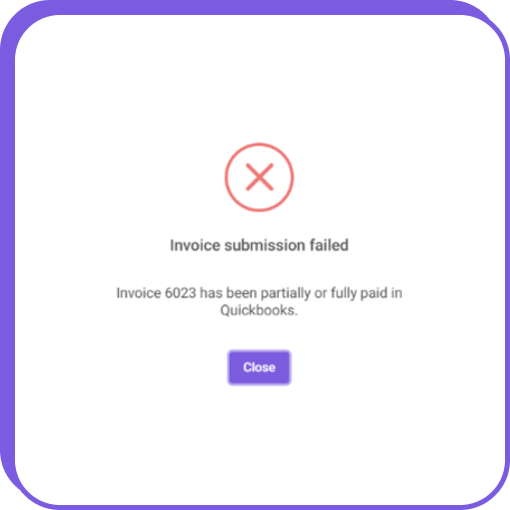
🚨 Error Message:
“Invoice submission failed: Invoice ### has been partially or fully paid in QuickBooks.”
How to Fix It:
- Log in to QuickBooks Online.
- Navigate to Sales → Invoices and locate the invoice that has a partial or full payment applied to it.
- Click on that invoice’s drop-down arrow and select View Activity to view the history of that invoice.
- Select the payment linked to that invoice to open up the Receive Payment window. From there, uncheck the invoice that is applied to the one that you want to modify, then click Save.
- QuickBooks will ask you if you want to save the payment as a credit. Continue by clicking on the Save as a Credit button. On the next screen, click Yes.
- Navigate back to Dispatch and resubmit the invoice to QuickBooks.
- Once the invoice has been resubmitted to QuickBooks, you can go back to QuickBooks, select
Sales → Customers and locate the customer that now has an unapplied credit. - Under the Transaction List, locate the payment transaction and click on the View/Edit link.
- Re-select the invoice that this payment should be applied to and click Save.
✅ Best Practice: Before applying payments, ensure your invoice is accurate and does not need modification before sending it to customers or applying payments to it.
Final Tips for Smooth Syncing:
✅ Double-check customer, item, and tax settings in QuickBooks before syncing invoices.
✅ Use in-app error messages in Dispatch to quickly diagnose and fix sync issues.
✅ If an invoice fails, update the necessary settings and try to resync the invoice—no need to re-enter data manually!
Need More Help?
Contact Customer Support at 1.800.263.6149 for assistance.